> For the complete documentation index, see [llms.txt](https://developer.kizen.com/llms.txt). Markdown versions of documentation pages are available by appending `.md` to page URLs; this page is available as [Markdown](https://developer.kizen.com/docs/integrations-and-plugins/integrations/fhir-beta/read-and-write-fhir-data-in-an-agentic-workflow.md).
# Read and Write FHIR Data in an Agentic Workflow
Add FHIR action steps to a Kizen Agentic Workflow to read, search, create, update, and patch FHIR data.
{% hint style="success" %}
**Audience:** Admins, Developers, Solution Architects
**Purpose:** Explains how to add FHIR action steps to space.vars.automations in space.vars.Kizen\_company\_name to read and write live FHIR data
{% endhint %}
## Overview
{% hint style="warning" %}
**Caution:** This setup reflects Kizen's default configuration. Your administrator may have customized your layout, so columns or navigation may appear differently. Trial accounts may have limited features.
{% endhint %}
Once you use the FHIR integration to authenticate to your FHIR® server, you can read and write live FHIR data directly from an space.vars.automation.
***
## Before You Begin
To read and write FHIR data in an space.vars.automation, you need:
* A connection from space.vars.Kizen\_company\_name to your FHIR server. For details, see [Set Up FHIR in Kizen](/docs/integrations-and-plugins/integrations/fhir-beta/set-up-fhir-in-kizen.md).
* A valid access token and base URL for your FHIR server. See [Authenticate to a FHIR Server in an Agentic Workflow](/docs/integrations-and-plugins/integrations/fhir-beta/authenticate-to-a-fhir-server-in-an-agentic-workflow.md) for more information.
***
## Read and Write FHIR in an Agentic Workflow
To read and write FHIR in an space.vars.automation:
{% stepper %}
{% step %}
#### Go to the Agentic Workflow builder
In the global navigation, select **Agentic Workflows**. Then, to open the builder, do one of the following:
* Select **New Agentic Workflow**.
* Select the name of an existing space.vars.automation.
{% endstep %}
{% step %}
#### Add an action to the Agentic Workflow
In the builder, select **+**, and then select **Add Action**.
{% endstep %}
{% step %}
#### Select the FHIR action
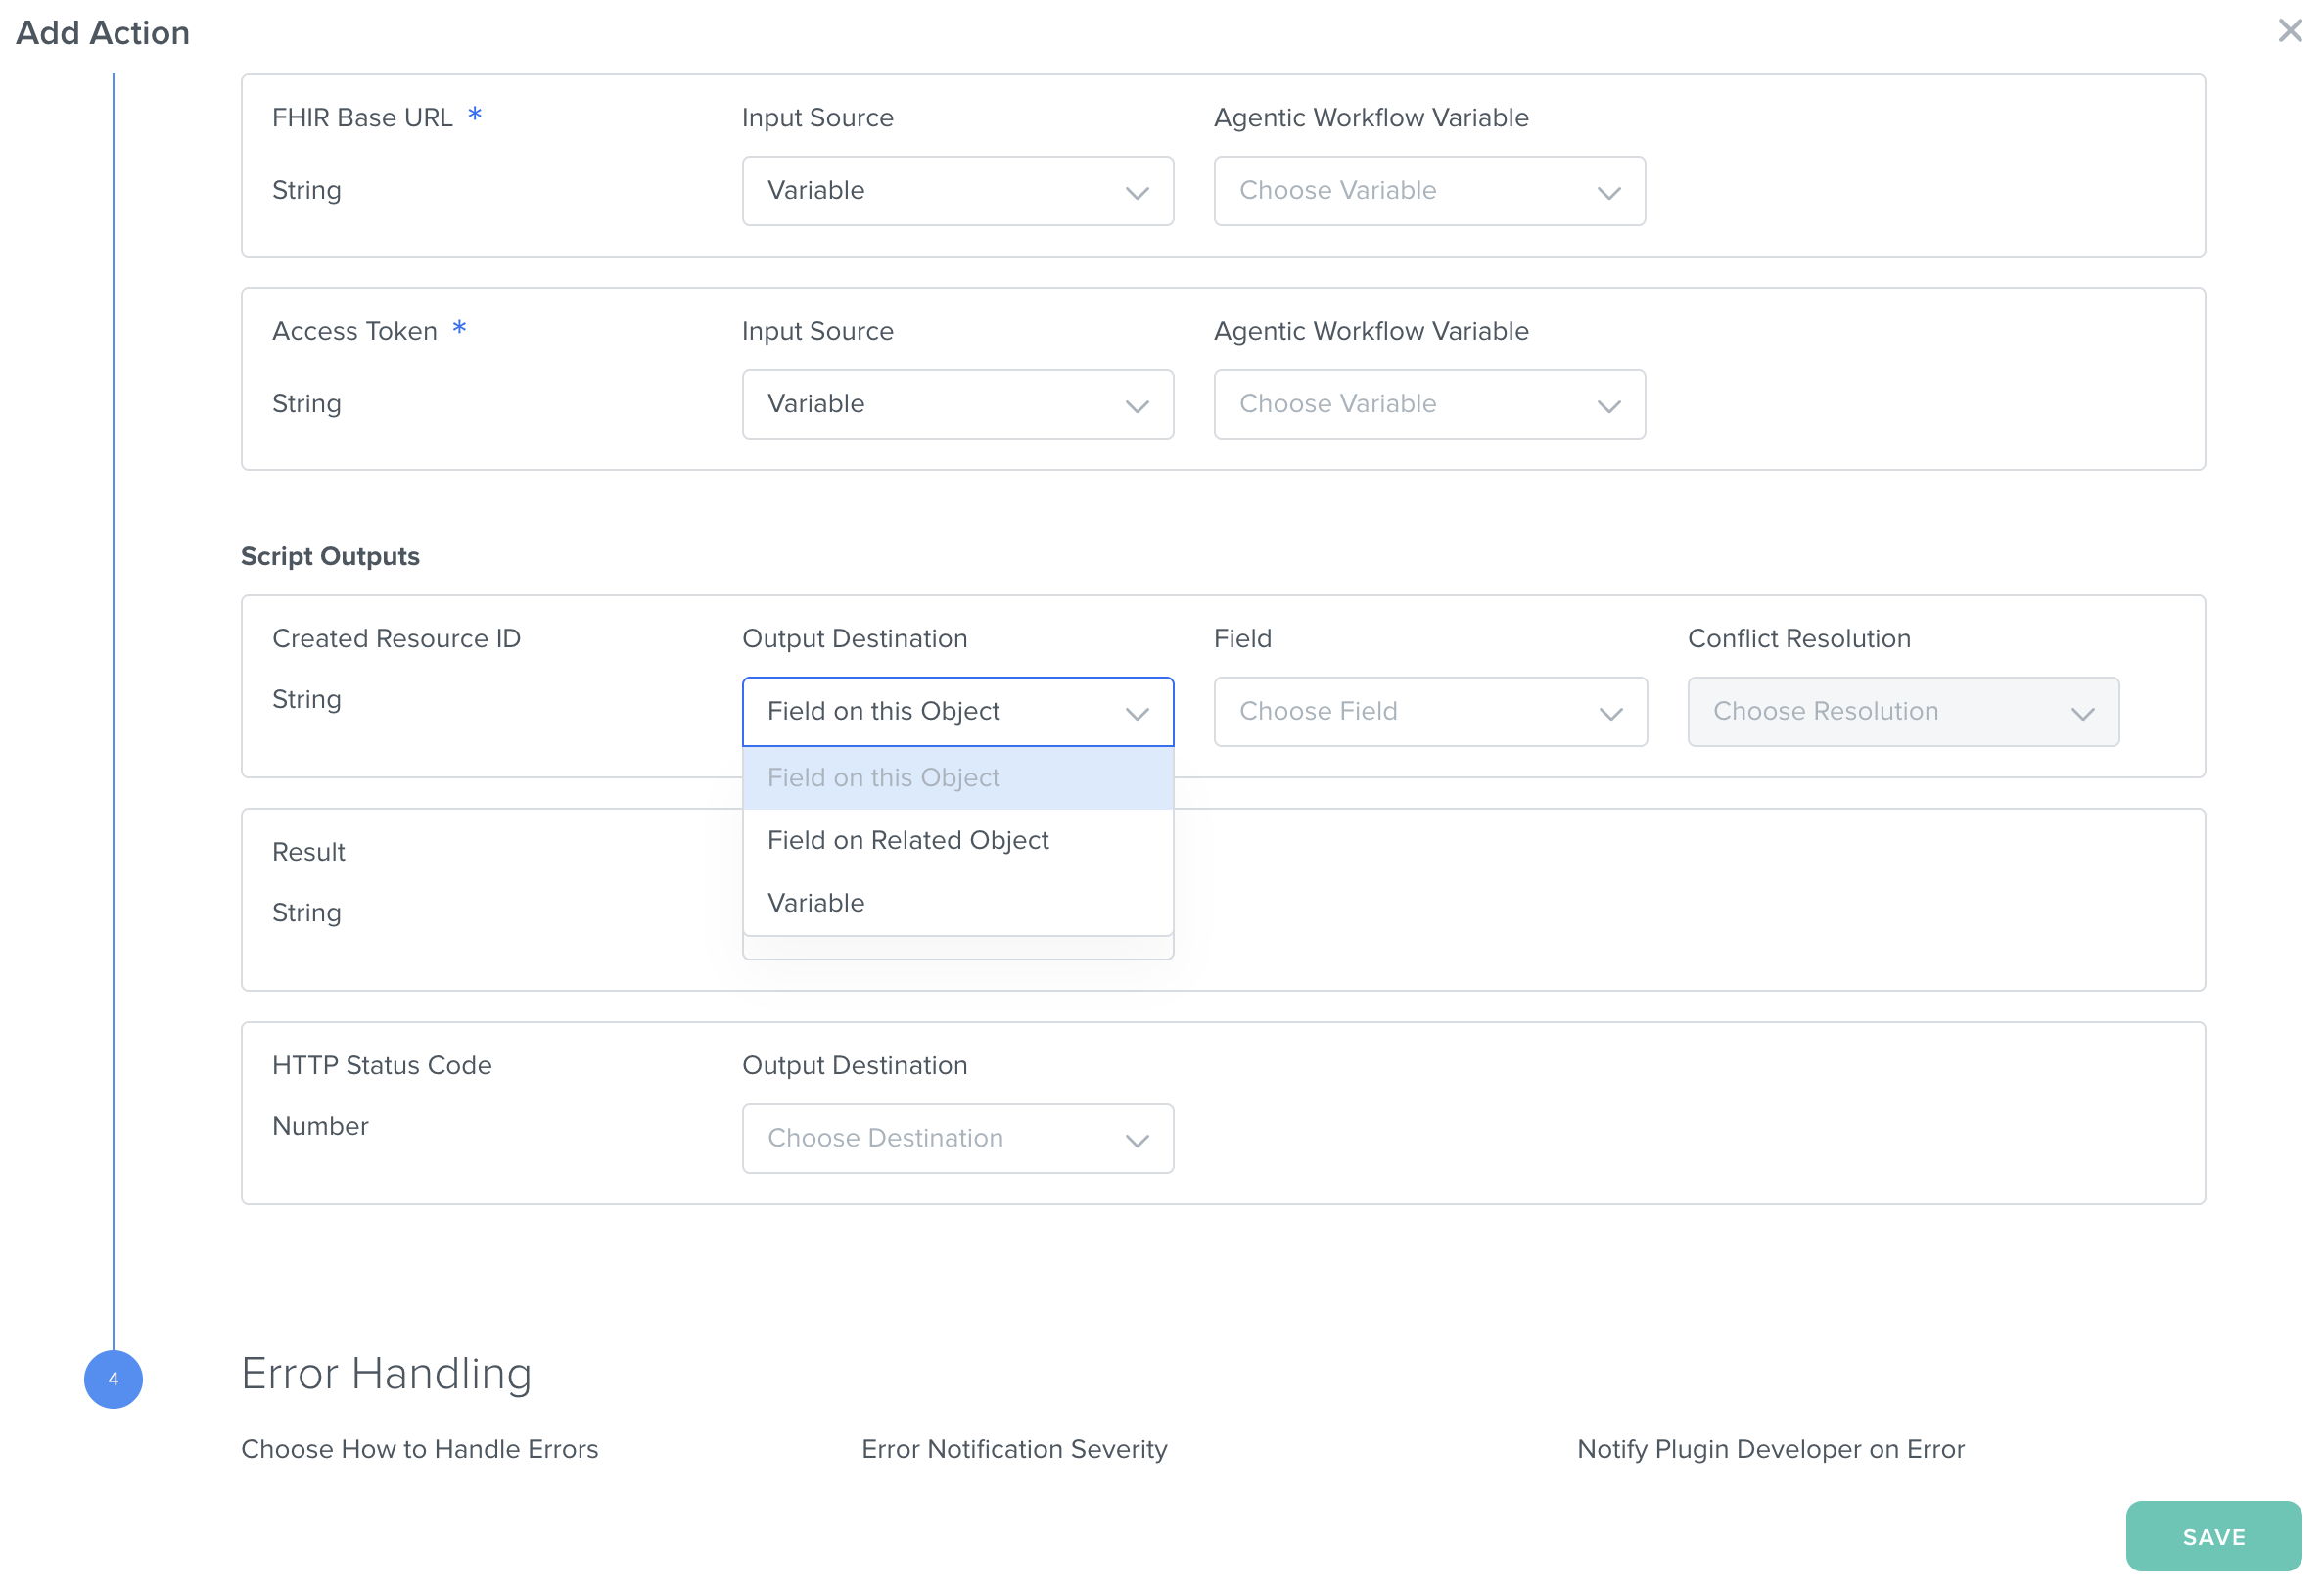
In the Add Action modal that appears, scroll to the Integration section, and select the FHIR connection card.
{% endstep %}
{% step %}
#### Choose the function to perform
In the Action Settings section of the Add Action modal, select the **Action** dropdown menu, and do one of the following:
* To read a single FHIR resource, select **FHIR Read**, and set up the action. For more information, see [Set Up a FHIR Read Action](#set-up-a-fhir-read-action) below.
* To search FHIR resources and return results, select **FHIR Search**, and set up the action. For more information, see [Set Up a FHIR Search Action](#set-up-a-fhir-search-action) below.
* To create a new FHIR resource, select **FHIR Create**, and set up the action. For more information, see [Set Up a FHIR Create Action](#set-up-a-fhir-create-action) below.
* To update an existing FHIR resource in its entirety, select **FHIR Update**, and set up the action. For more information, see [Set Up a FHIR Update Action](#set-up-a-fhir-update-action) below.
* To update certain fields of an existing FHIR resource, select **FHIR Patch**, and set up the action. For more information, see [Set Up a FHIR Patch Action](#set-up-a-fhir-patch-action) below.
{% hint style="info" %}
**Note:** Each of these actions depends on the access token and base URL that the FHIR Authenticate action obtains. If you haven't added FHIR Authenticate to your space.vars.automation, you should do so now. See [Authenticate to a FHIR Server in an Agentic Workflow](/docs/integrations-and-plugins/integrations/fhir-beta/authenticate-to-a-fhir-server-in-an-agentic-workflow.md) for details.
{% endhint %}
{% endstep %}
{% step %}
#### Configure error handling
In the Error Handling section of the modal, specify how to handle errors in this step of the space.vars.automation.
{% endstep %}
{% step %}
#### Save the FHIR action
Select **Save**.
{% endstep %}
{% endstepper %}
***
## Set Up a FHIR Read Action
The FHIR Read action reads a single FHIR resource by its type and ID.
To set up a FHIR Read action:
{% stepper %}
{% step %}
#### Configure the sources for the script inputs
For each of the fields in the Script Inputs section of the Add Action modal, select the source of the field's value from the **Input Source** dropdown menu, and then configure the source with the additional controls that appear.
The fields are as follows:
| Field | Type | Description | Required? |
| ----------------- | -------- | -------------------------------------------------------------------------------------------- | --------- |
| **Access Token** | `String` | The access token from the FHIR Authenticate action | Yes |
| **FHIR Base URL** | `String` | The base URL of the FHIR server from the FHIR Authenticate action | Yes |
| **Resource ID** | `String` | The ID of the FHIR resource to read | Yes |
| **Resource Type** | `String` | The type of the FHIR resource to read in PascalCase, such as `Patient` or `PractitionerRole` | Yes |
| {% endstep %} | | | |
{% step %}
#### Configure the destinations for the script outputs
For each of the fields in the Script Outputs section of the modal, select the destination of the field's value from the **Output Destination** dropdown menu, and then configure the destination with the additional controls that appear.
The fields are as follows:
| Field | Type | Description | Required? |
| -------------------- | -------- | ----------------------------------------------------- | --------- |
| **HTTP Status Code** | `Number` | The HTTP status code that the read operation returned | No |
| **Result** | `String` | The result of the read operation in JSON format | No |
| {% endstep %} | | | |
| {% endstepper %} | | | |
***
## Set Up a FHIR Search Action
The FHIR Search action runs a search on FHIR resources of the specified type and returns the results for use in your space.vars.automation.
{% hint style="info" %}
**Note:** The FHIR Search action returns the first page of results only. For large results sets, use `_count` in the search parameters to control page size and handle pagination manually in the space.vars.automation.
{% endhint %}
To set up a FHIR Search action:
{% stepper %}
{% step %}
#### Configure the sources for the script inputs
For each of the fields in the Script Inputs section of the Add Action modal, select the source of the field's value from the **Input Source** dropdown menu, and then configure the source with the additional controls that appear.
The fields are as follows:
| Field | Type | Description | Required? |
| --------------------- | -------- | ---------------------------------------------------------------------------------------------- | --------- |
| **Access Token** | `String` | The access token from the FHIR Authenticate action | Yes |
| **FHIR Base URL** | `String` | The base URL of the FHIR server from the FHIR Authenticate action | Yes |
| **Resource Type** | `String` | The type of the FHIR resource to search in PascalCase, such as `Patient` or `PractitionerRole` | Yes |
| **Search Parameters** | `String` | The parameters of the search, like this: `_count=10&_lastUpdated=gt2026-02-10T00:00:00Z` | No |
{% hint style="info" %}
**Note:** If you don't specify search parameters, the integration returns all FHIR resources of that type.
{% endhint %}
{% endstep %}
{% step %}
#### Configure the destinations for the script outputs
For each of the fields in the Script Outputs section of the modal, select the destination of the field's value from the **Output Destination** dropdown menu, and then configure the destination with the additional controls that appear.
The fields are as follows:
| Field | Type | Description | Required? |
| -------------------- | -------- | ---------------------------------------------------------------------------------------------------------------------------------------- | --------- |
| **HTTP Status Code** | `Number` | The HTTP status code that the search operation returned. | No |
| **Result** | `String` | The result set as a JSON string. | No |
| **Total Count** | `Number` | The total number of entries on the first page of results. Note that this isn't necessarily the same as the total number of FHIR bundles. | No |
{% hint style="info" %}
**Note:** Large search results might cause timeouts. Consider streamlining the search by providing targeted search parameters.
{% endhint %}
{% endstep %}
{% endstepper %}
***
## Set Up a FHIR Create Action
The FHIR Create action creates a new FHIR resource of the specified type from data in space.vars.Kizen\_company\_name.
{% hint style="info" %}
**Note:** The FHIR Create action can't consume a FHIR Search result directly. You must parse the result with the Parse FHIR Resource action first.
{% endhint %}
To set up a FHIR Create action:
{% stepper %}
{% step %}
#### Configure the sources for the script inputs
For each of the fields in the Script Inputs section of the Add Action modal, select the source of the field's value from the **Input Source** dropdown menu, and then configure the source with the additional controls that appear.
The fields are as follows:
| Field | Type | Description | Required? |
| ----------------- | -------- | -------------------------------------------------------------------------------------------------- | --------- |
| **Access Token** | `String` | The access token from the FHIR Authenticate action | Yes |
| **FHIR Base URL** | `String` | The base URL of the FHIR server from the FHIR Authenticate action | Yes |
| **Resource Body** | `String` | The FHIR resource to create as a JSON string. Take this value from the output of a FHIR Read step. | Yes |
| **Resource Type** | `String` | The type of the FHIR resource to create in PascalCase, such as `Patient` or `PractitionerRole`. | Yes |
| {% endstep %} | | | |
{% step %}
#### Configure the destinations for the script outputs
For each of the fields in the Script Outputs section of the modal, select the destination of the field's value from the **Output Destination** dropdown menu, and then configure the destination with the additional controls that appear.
The fields are as follows:
| Field | Type | Description | Required? |
| ----------------------- | -------- | ------------------------------------------------------- | --------- |
| **Created Resource ID** | `String` | The ID of the created FHIR resource | No |
| **HTTP Status Code** | `Number` | The HTTP status code that the create operation returned | No |
| **Result** | `String` | The JSON string of the created FHIR resource | No |
| {% endstep %} | | | |
| {% endstepper %} | | | |
***
## Set Up a FHIR Update Action
The FHIR Update action replaces an existing FHIR resource of the specified type by overwriting it completely with data from space.vars.Kizen\_company\_name.
To set up a FHIR Update action:
{% stepper %}
{% step %}
#### Configure the sources for the script inputs
For each of the fields in the Script Inputs section of the Add Action modal, select the source of the field's value from the **Input Source** dropdown menu, and then configure the source with the additional controls that appear.
The fields are as follows:
| Field | Type | Description | Required? |
| ----------------- | -------- | ---------------------------------------------------------------------------------------------- | --------- |
| **Access Token** | `String` | The access token from the FHIR Authenticate action | Yes |
| **FHIR Base URL** | `String` | The base URL of the FHIR server from the FHIR Authenticate action | Yes |
| **Resource Body** | `String` | The FHIR resource to update as a JSON string | Yes |
| **Resource ID** | `String` | The ID of the FHIR resource to update | Yes |
| **Resource Type** | `String` | The type of the FHIR resource to update in PascalCase, such as `Patient` or `PractitionerRole` | Yes |
| {% endstep %} | | | |
{% step %}
#### Configure the destinations for the script outputs
For each of the fields in the Script Outputs section of the modal, select the destination of the field's value from the **Output Destination** dropdown menu, and then configure the destination with the additional controls that appear.
The fields are as follows:
| Field | Type | Description | Required? |
| -------------------- | -------- | ------------------------------------------------------- | --------- |
| **HTTP Status Code** | `Number` | The HTTP status code that the update operation returned | No |
| **Result** | `String` | The JSON string of the updated FHIR resource | No |
| {% endstep %} | | | |
| {% endstepper %} | | | |
***
## Set Up a FHIR Patch Action
The FHIR Patch action partially updates a FHIR resource of the specified type with data from space.vars.Kizen\_company\_name. Unlike FHIR Update, this action doesn't overwrite the resource completely.
To set up a FHIR Patch action:
{% stepper %}
{% step %}
#### Configure the sources for the script inputs
For each of the fields in the Script Inputs section of the Add Action modal, select the source of the field's value from the **Input Source** dropdown menu, and then configure the source with the additional controls that appear.
The fields are as follows:
| Field | Type | Description | Required? |
| ---------------------- | -------- | ------------------------------------------------------------------------------------------------- | --------- |
| **Access Token** | `String` | The access token from the FHIR Authenticate action | Yes |
| **FHIR Base URL** | `String` | The base URL of the FHIR server from the FHIR Authenticate action | Yes |
| **Patch Body** | `String` | The JSON Patch or FHIR Patch string to apply to the FHIR resource. | Yes |
| **Patch Content Type** | `String` | The technical content type of the patch body. The default value is `application/json-patch+json`. | No |
| **Resource ID** | `String` | The ID of the FHIR resource to patch. | Yes |
| **Resource Type** | `String` | The type of the FHIR resource to patch in PascalCase, such as `Patient` or `PractitionerRole`. | Yes |
{% hint style="info" %}
**Note:** Give the patch body in either the JSON Patch format (RFC 6902) or the FHIR Patch format.
{% endhint %}
{% endstep %}
{% step %}
#### Configure the destinations for the script outputs
For each of the fields in the Script Outputs section of the modal, select the destination of the field's value from the **Output Destination** dropdown menu, and then configure the destination with the additional controls that appear.
The fields are as follows:
| Field | Type | Description | Required? |
| -------------------- | -------- | ------------------------------------------------------ | --------- |
| **HTTP Status Code** | `Number` | The HTTP status code that the patch operation returned | No |
| **Result** | `String` | The JSON string of the patched FHIR resource | No |
| {% endstep %} | | | |
| {% endstepper %} | | | |
***
## What's Next
Continue to [Synchronize Data Between FHIR and Kizen in an Agentic Workflow](/docs/integrations-and-plugins/integrations/fhir-beta/synchronize-data-between-fhir-and-kizen-in-an-agentic-workflow.md) to learn how to use space.vars.automations to keep your FHIR data in space.vars.Kizen\_company\_name up to date.
Related Topics
* [FHIR - Beta](/docs/integrations-and-plugins/integrations/fhir-beta.md)
* [Set Up FHIR in Kizen](/docs/integrations-and-plugins/integrations/fhir-beta/set-up-fhir-in-kizen.md)
* [Authenticate to a FHIR Server in an Agentic Workflow](/docs/integrations-and-plugins/integrations/fhir-beta/authenticate-to-a-fhir-server-in-an-agentic-workflow.md)
* [Synchronize Data Between FHIR and Kizen in an Agentic Workflow](/docs/integrations-and-plugins/integrations/fhir-beta/synchronize-data-between-fhir-and-kizen-in-an-agentic-workflow.md)
* [Troubleshoot FHIR](/docs/integrations-and-plugins/integrations/fhir-beta/troubleshoot-fhir.md)
***
*HL7, FHIR, and the FHIR FLAME DESIGN are the registered trademarks of Health Level Seven International, and their use does not constitute endorsement by HL7.*
---
# Agent Instructions
This documentation is published with GitBook. GitBook is the documentation platform designed so that both humans and AI agents can read, navigate, and reason over technical content effectively. Learn more at gitbook.com.
## Querying This Documentation
If you need additional information that is not directly available in this page, you can query the documentation dynamically by asking a question.
Perform an HTTP GET request on the current page URL with the `ask` query parameter, and the optional `goal` query parameter:
```
GET https://developer.kizen.com/docs/integrations-and-plugins/integrations/fhir-beta/read-and-write-fhir-data-in-an-agentic-workflow.md?ask=&goal=
```
`ask` is the immediate question: it should be specific, self-contained, and written in natural language.
`goal` is optional and describes the broader end goal you are ultimately trying to accomplish on behalf of the user. GitBook uses it to tailor the answer towards what is most useful for that goal.
The response will contain a direct answer to the question and relevant excerpts and sources from the documentation.
Use this mechanism when the answer is not explicitly present in the current page, you need clarification or additional context, or you want to retrieve related documentation sections.